Práctica Repisa Para Decorar Tus Espacios (Esp-Eng)
Feliz día amigos qué gusto saludarles y estar nuevamente en esta comunidad que me dio la bienvenida hace poco y en la que me he sentido súper cómoda, pues maneja un tema que me encanta y es sobre el hogar, de esos tips que siempre usamos para facilitar nuestra vida dentro de la casa y las mejoras e ideas para hacerlo más fácil.

Aquí conocerás y el proceso del antes y el después de este proyecto a fin de tener unos espacios más armónicos y mejor calidad de vida.
Muchas veces vemos espacios grises, sin alegría y nos enfocamos en otras cosas y no le damos vida, hasta que nos acostumbramos a eso. Me he dado cuenta que con cosas muy simples podemos ambientar un espacio, que este luzca de manera increíble y no necesitas hacer precisamente una gran inversión o comprar algo muy costoso, sino con algo que puedes hacer tú misma e incluso con materiales de re uso.
Happy day friends what a pleasure to greet you and be back in this community that welcomed me recently and in which I have felt super comfortable, because it handles a topic that I love and is about the home, of those tips that we always use to facilitate our life inside the house and improvements and ideas to make it easier.
Here you will learn about the before and after process of this project in order to have more harmonious spaces and better quality of life.
Many times we see gray spaces, without joy and we focus on other things and do not give life, until we get used to that. I have realized that with very simple things we can set a space, that it looks amazing and you don't need to make a big investment or buy something very expensive, but with something you can do yourself and even with reuse materials.


Les cuento que hace un tiempo uno de mis hermanos monto un negocio en una carpintería tuve la oportunidad de ir y vi cómo de botaban pedacitos de madera que ya no le servía para lo que ellos estaban haciendo, entonces me dispuse a utilizar estos pedacitos de madera que iban a hacer desechados y darle un uso más productivo y que me sirviera a su vez para decorar esa pared que desde hace un tiempo me seguía pareciendo que le faltaba vida y carácter, no quería solo ver una pared blanca y ya.
Por lo que aproveché este recurso lo primero que hice fue idear que quería hacer, básicamente esto es una repisa para colocarla en el comedor, pero no es cualquier repisa esta tiene a su vez varios varias divisiones y hacen un contraste que se ve muy armónico, delicado y diferente.
Tampoco quería la típica repisa donde es una tabla con unos pies de amigo y ya, no, quería algo que tuviese más proporciones y en mi afán de encontrar el adorno perfecto que cumpliera con mis expectativas y una de ellas es que sea bonito, que sea diferente y sobre todo que sea muy pero muy económico.
I tell you that some time ago one of my brothers set up a business in a carpentry shop I had the opportunity to go and saw how they threw away pieces of wood that no longer served for what they were doing, then I decided to use these pieces of wood that were going to be discarded and give it a more productive use and that would serve me in turn to decorate that wall that for some time still seemed to me that it lacked life and character, I did not want to just see a white wall and that's it.
So I took advantage of this resource the first thing I did was to devise what I wanted to do, basically this is a shelf to place in the dining room, but it is not just any shelf this has several divisions and make a contrast that looks very harmonious, delicate and different.
I did not want the typical shelf where it is a table with a few feet of friend and already, no, I wanted something that had more proportions and in my eagerness to find the perfect ornament that meets my expectations and one of them is that it is beautiful, that is different and above all that is very but very economical.


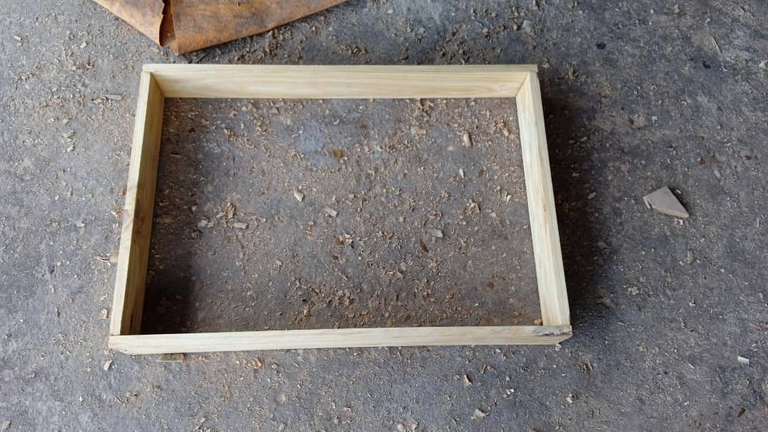
Entonces armé mi dibujo de la repisa que quería hacer, luego busqué las medidas que necesitaba para llevarlo a cabo, marqué las medidas y con ayuda de mi hermano hice los cortes, luego con pega blanca y clavos fijé las cuatro esquinas de lo que sería el primer cuadrado de mi repisa.
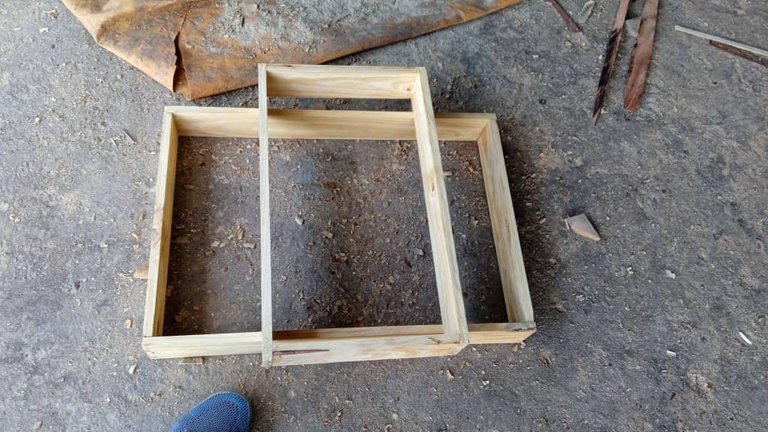
Luego hice la segunda pieza o el segundo rectángulo este de un tamaño distinto y luego les enseñaré el porqué y para finalizar hice el otro rectángulo más grande que formaría la tercera parte de mi repisa para el comedor.
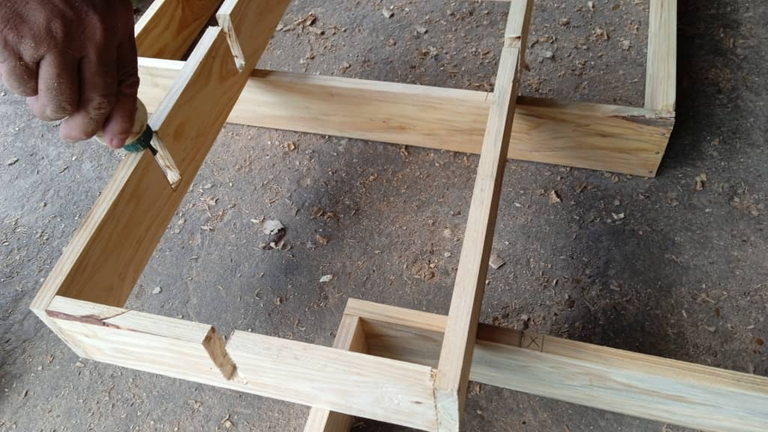
Al tener estos tres rectángulos listos con diferentes tamaños ya pegados con cola blanca y con clavos comencé el armado, qué trataba básicamente en incrustar o entrelazar estos tres rectángulos y para ello marqué en la proporción que quería para luego hacer unos cortes que inicialmente se hicieron con una sierra y luego se terminaron con un serrucho.
Para que tuviese un corte preciso corté con la sierra y terminé con un serrucho. Teniendo estos cortes realizados pude entrelazar las tres figuras geométricas, los tres rectángulos en un solo mueble por así decirlo y a estos empalmes le eche pega blanca para luego reforzarlo con clavos sin cabeza para que no se notara.
Then I made my drawing of the shelf I wanted to make, then I looked for the measurements I needed to carry it out, I marked the measurements and with the help of my brother I made the cuts, then with white glue and nails I fixed the four corners of what would be the first square of my shelf.
Then I made the second piece or the second rectangle this one of a different size and later I will show you why and finally I made the other larger rectangle that would form the third part of my dining room shelf.
When I had these three rectangles ready with different sizes already glued with white glue and nails I began the assembly, which was basically to embed or interlock these three rectangles and for this I marked in the proportion I wanted to then make some cuts that were initially made with a saw and then finished with a handsaw.
To have a precise cut I cut with the saw and finished with a handsaw. Having these cuts made I could intertwine the three geometric figures, the three rectangles in a single piece of furniture so to speak and to these joints I put white glue and then reinforce it with headless nails so that it would not be noticed.


Ya teniendo la repisa armada comencé a lijarla con ayuda del esmeril con un disco de lija, se lo pasamos un poco sobre todo en las orillas porque las tablas ya estaban cepilladas y quería que mantuviese una textura lisa, utilizando las siguientes medidas 47 por 41 cm, uno de 30 por 49 cm y el 'ultimo de 60 por 43 cm.
Me la traje para acá para la casa, la fijé en la pared donde quería que estuviese,luego preparé en proporciones iguales en un envase plástico tinta color nogal, sellador para madera y thinner, hice una mezcla en las mismas proporciones al ojo por ciento ya que no sé nada de estas mezclas, pero hice una prueba y sí me daba el tono deseado, que hacía mucho contraste con mi comedor.
Me coloqué una bolsa en la mano y con un trapito pinté la madera por cada extremo de la de la repisa, la mezcla de la tinta le daba un acabado brillante, sin embargo como estoy en un proceso de de arreglos en la cocina cuando me hagan las puertas de la cocina y vaya a pintarlas que vaya a usar el barniz aprovecho y la saco para que le echen un poquito de barniz a fin que le dé un poquito de brillo.
Once I had the shelf assembled I began to sand it with the help of the emery with a sanding disc, we passed it a little especially on the edges because the boards were already planed and I wanted to keep a smooth texture, using the following measures 47 by 41 cm, one of 30 by 49 cm and the 'last one of 60 by 43 cm.
I brought it here to the house, I fixed it on the wall where I wanted it to be, then I prepared in equal proportions in a plastic container walnut color ink, wood sealer and thinner, I made a mixture in the same proportions to the eye percent since I know nothing about these mixtures, but I did a test and it gave me the desired tone, which made a lot of contrast with my dining room.
I put a bag in my hand and with a rag I painted the wood at each end of the shelf, the mixture of the ink gave it a glossy finish, however as I am in a process of repairs in the kitchen when I do the kitchen doors and go to paint them I will use the varnish and take it out so they can put a little bit of varnish to give it a little bit of shine.


Ya teniendo mis repisas secas la coloqué en la pared que está destinada para ella y le puse algunos adornitos provisionales, porque no son los que los que van a quedar de forma definitiva, vi unos en una tienda y estoy por comprarlos.
Puse estos momentáneos para que vieran la proporción del tamaño de la repisa y así tengan una idea de las dimensiones de los cuadros y posteriormente les estaré enseñando cuáles fueron estos adornos.
Y bueno amigos espero que les haya gustado esta práctica y económica idea a fin de ambientar un lugar de tu casa, darle vida a ese espacio gris como lo hice yo con solo pedacitos de madera, con algunos clavos, un poquito de pega blanca y al final un poco de tinta para madera, se los comparto con mucho cariño.
Es una idea muy práctica que puedes realizar en diferentes espacios de tu casa utilizando las diferentes figuras geométricas gracias, a todos por leerme espero les sea de utilidad este tutorial, soy Yeli Marín @yelimarín y me despido hasta una próxima oportunidad.
Imágenes propias tomadas con mi Redmi 9A, utilicé el traductor de DeepL para compartirles la versión inglesa y la aplicación Inshot para la foto de portada.
Once my shelves were dry I placed it on the wall that is destined for it and I put some provisional ornaments, because they are not the ones that are going to be definitive, I saw some in a store and I am about to buy them.
I put these momentary ones so that you could see the proportion of the size of the shelf and thus have an idea of the dimensions of the pictures and later I will be showing you what these ornaments were.
And well friends I hope you liked this practical and economical idea in order to set a place in your home, give life to that gray space as I did with just bits of wood, with some nails, a little white glue and at the end a little wood dye, I share them with love.
It is a very practical idea that you can do in different spaces of your home using different geometric shapes, thank you all for reading me, I hope this tutorial will be useful, I'm Yeli Marín @yelimarín and I'll say goodbye until next time.
Own images taken with my Redmi 9A, I used the translator of DeepL to share with you the English version and the Inshot application for the cover photo.

Nota: Tuve ayuda de mi hermano para realizar los cortes y manejar algunas herramientas.
Note: I had help from my brother to make the cuts and handle some tools.

Que bellas quedaron @yelimarin y que buena idea para reutilizar las cosas que cualquiera pudiera pensar en botar. Saludos 🤗
Si amiga, a veces vemos casa que no tienen ningún adorno y tienen estos recursos que solo con la creatividad puedes transformar y quedan geniales e incluso puedes utilizarlo de acuerdo a tus necesidades.
Gracias amiga, es increíble todo lo que podemos hacer con materiales muy sencillos, sólo tenemos que poner a volar la creatividad.
Vayalo. Quedó bien fino
Gracias mi estimado, aprovecha la artista que tienes en casa, esas manos hacen bellezas.
Te quedó muy hermosa tu repisa, original y hecha a tu gusto, esa, sin duda, es la mejor parte. Me alegra verte otra vez por aquí y que nos cuentes tus proyectos de decoración, seguro serán útiles para otros usuarios.
Te envío un fuerte abrazo. Saludos.
Gracias amiga, traté de explicarlo muy bien para que fuese de utilidad para otros usuarios, gracias por el apoyo. Nos vemos pronto.
Hola, amiga. Bienvenida nuevamente a la comunidad. Es un gusto tenerte de regreso con un proyecto tan genial.
Me encanta que reutilizaste madera que aparentemente ya no servía y entre tú y tu hermano fabricaron algo que se ve tan bello, además me imagino que fue a bajísimo costo.
Muchas gracias por compartir y felicidades por tus nuevas repisas 🤗
Hola amiga, si, estuve en EPA y una repisita sencilla no bajo de 30 $, lo sorprendente es que con algo que ya se iba a votar pide hacer algo decorativo y a bajo costo.
Gracias por pasar por mi publicación, con este proyecto pude ambientar un espacio y logré hacerlo a un bajo costo, por lo que es una alerntiva muy buena a la hora de organizar adornos e incluso juguetes.
Wow, me enamoré de tu repisa, esta bellísima, me gusta la disposición de sus elementos, preciosa esta, gracias por compartir con nosotros el proceso, nos has dado una idea genial. Yo quiero algunas repisas así, para algunos juguetes de mi hijo.
Hola amiga, si también pensé en una para el cuarto, incluso las puedes poner separadas y fijarlas en una pared que estén muy cerca, las puedes pintar de colores también.
Si amiga, para unos juguetes te sirve e incluso sin pegarlas cruzadas, las puedes poner cerca una a la otra pero sin entrelazarlas, también las puedes pintar de colores y recrear otras figuras geométricas, buena suerte.
Muchas gracias por las recomendaciones amiga!
Guau, quedó de lo más estético y fino, me encantó cómo aprovechaste esa madera con un resultado profesional y decorativo. 😍
Gracias amiga, te envío un abrazo en la distancia, espero este contenido sea de productividad para otros.
Amiga esta genial esta repisa, muy original, ya que fue echa a mano con tus ideas.
Que bueno que reciclastes esa madera y le diste un uso fenomenal.
Seguro muchos tomarán esta idea genial a mi me encantó, gracias por compartinos en la comunidad, es de gran valor.
Gracias amiga por la apreciación, espero les sirva el paso a paso para que puedan recrearlo. Un abrazo.
Que bonita esa repisa, decorala con portaretratos de tu familia ami.
saludos
Quedó genial!!! Me gusta mucho este tipo de proyectos con madera ☺️. Le haz dado vida a esa pared y un toque elegante al espacio 👍🏼
Que lindo!! Me gusta. :D
!LUV
@yelimarin, @phoenixwren(1/1) sent LUV. | connect | community | HiveWiki | NFT | <>< daily
! help(no space) to get help on Hive. Info